Iecodebook
iecodebook is the final command in the Stata package created by DIME Analytics, iefieldkit. After data collection is complete, iecodebook allows the research team to automatically perform the repetitive steps involved in cleaning data before further analysis. As the name suggests, the iecodebook command is structured around Excel-based codebooks, which allow researchers to perform and document data cleaning tasks in Excel itself, instead of using do-files.
Read First
- Please refer to Stata coding practices for coding best practices in Stata.
iecodebookis part of the packageiefieldkit, which has been developed by DIME Analytics.- The
iecodebookand its subcommands allow the research team to rapidly clean, harmonize, and document datasets using codebooks. - Codebooks allow researchers to document the cleaned data in a format that is both human and machine-readable.
- To install
iecodebookand all the commands in theiefieldkitpackage, typessc install iefieldkitin Stata. - For instructions and available options, type
help iecodebook.
Overview
As its name suggests, the iecodebook command creates Excel-based codebooks. The research team can fill these codebooks with data cleaning instructions for Stata. In this way, iecodebook creates a metadata record which is easier to write than a long sequence of data cleaning commands in a do-file. These codebooks in Excel are also easier to read and understand, even if someone does not have knowledge of Stata. There are four subcommands in iecodebook to support its functions:
iecodebook applyreads an Excel codebook where the user renames, recodes, and/or labels a large number of variables, and applies these changes to the current dataset.
iecodebook appendallows two or more datasets to have the same variable names, labels, and value labels. That is, it harmonizes two or more datasets, and then appends them. As you will see, this is different from simply using theappendcommand in Stata.
iecodebook exportcreates an Excel codebook that describes the current dataset. It can also produce an exportable version of the dataset which only contains the variables used in a particular do-file.
iecodebook templatecreates an Excel template that describes the current or targeted dataset(s), and prepares the codebook for the otheriecodebooksubcommands.
Apply
The most common data cleaning tasks include renaming variables, applying variable and value labels, and recoding values. The iecodebook apply subcommand allows the research team to perform all of these tasks without writing separate lines of code for each task in Stata. The following steps list how the iecodebook apply works.
- Create template:
iecodebookfirst converts the dataset into a template in Excel usingiecodebook template. In this template, each column describes different aspects of a single variable, including name, label, type, and so on. - Complete template: After this, you can simply fill out the template, which creates the codebook. The codebook lists all the data cleaning tasks that you wish to perform on the dataset.
- Apply changes: The
iecodebook applysubcommand then reads these commands, and executes them all with just one line of Stata code. The resulting output is a cleaned dataset, along with an easy-to-read record of the cleaning commands you applied.
Syntax
The following line of code creates an apply template with the relevant dataset. The template is named filename.xlsx in this case.
iecodebook template using "filename.xlsx"
The following line of code applies the changes to the dataset. It saves the codebook with the same name, that is, filename.xlsx.
iecodebook apply using "filename.xlsx" ///
    , [drop] [missingvalues(# "label" [# "label" ...])]
Implementation
The following steps use an example to explain how iecodebook apply works in practice.
Step 1: Load the dataset
First, load the dataset that you want to clean. In this case, the dataset is named "auto.dta".
sysuse auto.dta , clear
Step 2: Create template
Next, run the following code to create the template codebook, which is named "cleaning.xlsx" in this case.
iecodebook template using "cleaning.xlsx"
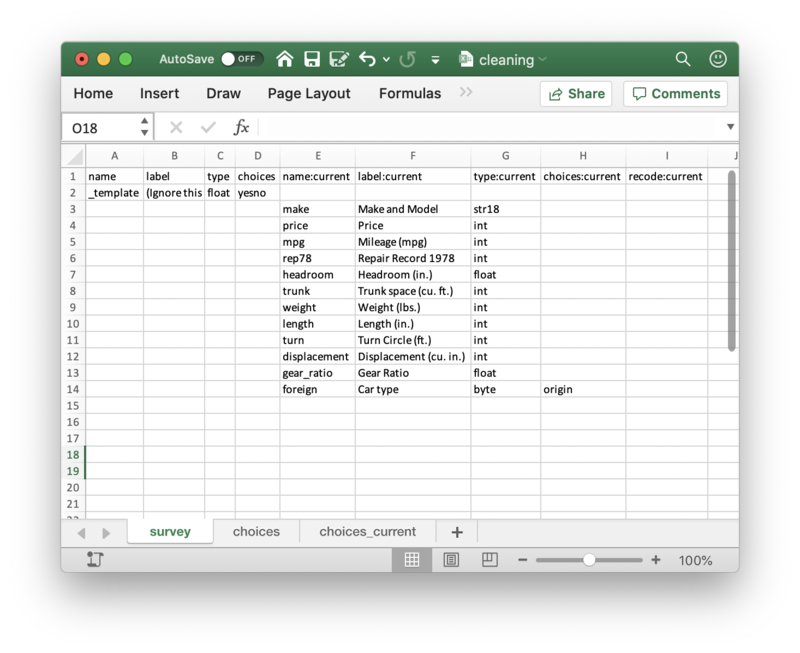
This produces the template codebook in Figure 1, which shows the state of the data before you make changes.
Step 3: Complete template
Next, fill-up the following columns in the template to specify the relevant cleaning tasks:
- name: Fill the name column in the template to specify what the
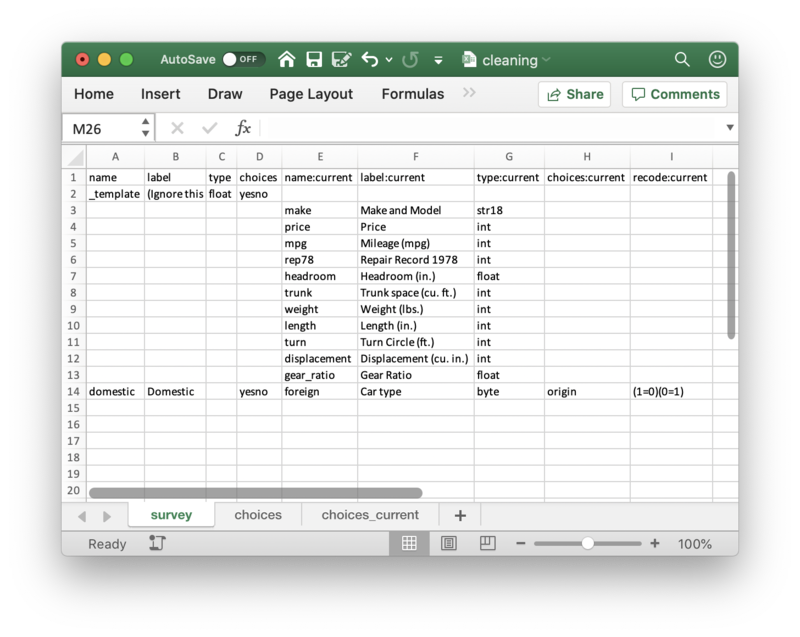
renamecommand will do to the variables in the dataset. You can use this to rename a variable. For example, in Figure 3, we rename the foreign variable to domestic depending on which of these names is assigned "0" and "1" in the choices sheet (shown in Figure 6).
- label: Fill the label columns in the template to specify what the
labelcommand will do to the variables in the dataset. You can use this to give more information about a variable.
- choices: Enter a label name in the choices column to apply a particular value label for a variable. Also create the corresponding value label in the choices sheet. Every template already includes a demo
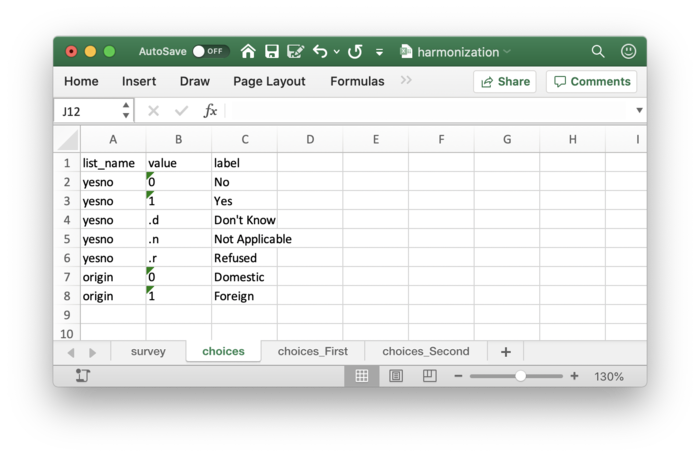
yesnolabel as a guide. For example, in Figure 3, we have applied theyesnovalue label to the variable with the name domestic, to indicate if a car is domestically made or not. We have also applied the origin value label to the variable with the name foreign. We will also create the origin value label in the choices sheet, for instance by assigning values of "0" to domestic, and "1" to foreign.
- recode:current: Use the usual syntax
(rule) [(rule) ...]in the recode:current column torecodedata values. For example, in Figure 3, we use(0=1)(1=0)to indicate that the label for the value of "0" has now been assigned to "1" , and the label for the value of "1" has now been assigned to "0". Using the example above, this means that now foreign has a value of "0", and domestic has a value of "1".
Note: The data types are given for reference only; you cannot use iecodebook to change them. Figure 3 shows how you can make the above changes to the foreign variable.
Step 4: Apply cleaning commands
Finally, apply the changes using the following command, and save the codebook with the same name as before - "cleaning.xlsx".
iecodebook apply using "cleaning.xlsx"
Note: Keep the following points in mind when using iecodebook apply.
- Default: By default, all variables where you do not make changes will be the same as before.
- Dropping variables: You can also use
iecodebook applyto drop variables from the dataset, using thedropoption, or using single periods (.).drop: You can simply use thedropoption to drop variables from the dataset that have no final variable name under the name column.- Single period (
.): Alternatively, you can place a single period (.) under the name column to drop variables one by one.
missingvalues(): Themissingvalues()option allows you to add global missing-value codes to all value labels. For example, if you use extended missing values consistently you can have.aor.nhave the same meaning in all responses.
- Value labels: You will have to manually recreate all value label lists in the choices sheet. However, you can copy-paste data labels from your original dataset to the choices_current sheet.
Append and Harmonize
A common task in data collection is combining two or more sequential rounds of surveys, or combining similar survey instruments that were used in different contexts. This is often a tricky process, and at least one of the datasets might not be correctly updated. In such a case, simply using the append command in Stata will not provide you with the desired structure for your dataset. In such cases, it is possible that certain aspects may not be synchronized or harmonized across the two datasets, such as:
- Variable names
- Variable labels (including translations)
- Value labels
- Data types
In these cases, iecodebook append offers a quick option to document and resolve these differences across multiple datasets. The following steps list how iecodebook append works.
- Create template: Just as in the case of
iecodebook apply, useiecodebook templateto first convert the dataset into a harmonization template in Excel. In this template, each column describes different aspects of a variable, including name, label, type, and so on. The only difference is that in this case,iecodebookalso creates a new variable called survey by default. The value label for this variable will contain the name of the surveys that you specify under thesurveys()option foriecodebook template. - Complete template: After this, you can simply fill out the template in Excel. In this template, you can specify the rules to
appendthe datasets, and resolve differences across the two datasets. For instance, you can place certain variables in the same row, andiecodebook appendwill understand this to mean that we want those variables to have the same values under the name, label and choices columns so that they canappendproperly. - Append datasets: The
iecodebook appendsubcommand then reads the rules that you specify in the template, and uses them to finallyappendthe datasets. The resulting output is a harmonized dataset with all the differences across the two datasets now resolved.
Syntax
The general syntax of iecodebook template in this case is as follows:
iecodebook template "filename.dta" "filename.dta" [...] ///
    using "filename.xlsx" ///
    , surveys(Survey1Name Survey2Name [...]) [match]
The following is the syntax to run iecodebook append subcommand based on the rules you specify in the harmonization template:
iecodebook append "filename.dta" "filename.dta" [...] ///
    using "filename.xlsx" ///
    , surveys(Survey1Name Survey2Name [...]) ///
    [generate(varname)] [keepall] [report] [replace] ///
    [missingvalues(# "label" [# "label" ...])]
The following points explain the options that are used with the iecodebook template and iecodebook append subcommands:
match: Thematchoption automatically aligns variables from other datasets in the same row if they share a name with a variable in the first dataset. It is optional for thetemplatesubcommand only.
surveys(): Thesurveys()option must be used with both subcommands, and the names you specify under this option must be the same for both subcommands. Specify the names of the surveys as a list of single words -(Survey1Name Survey2Name [...]).iecodebookwill look for these names in the headers of the codebook. The command will also create a survey variable in the resulting dataset by default. The value label for this variable will contain the name of the surveys that you specify under thesurveys()option.
generate(): To change the name of the survey variable, use thegenerate()option in both subcommands.
report: Thereportoption exports a codebook with the results of the resulting dataset for quick reference.
replace: Thereplaceoption allows you to overwrite the existing file which contains the codebook.
Implementation
The following steps show how iecodebook append works in practice.
Step 1: Create two different datasets
First, create two datasets that have similar data but different structures. Run the following code for this.
 sysuse auto.dta , clear
 save data1.dta , replace
 rename price cost
 rename mpg car_mpg
    recode foreign (0=1 "Domestic")(1=0 "Foreign") , gen(origin)
    drop foreign
 save data2.dta , replace
Note: We have used the same dataset, "auto.dta", to create two different datsets, "data1.dta" and "data2.dta"
Step 2: Combine the datasets
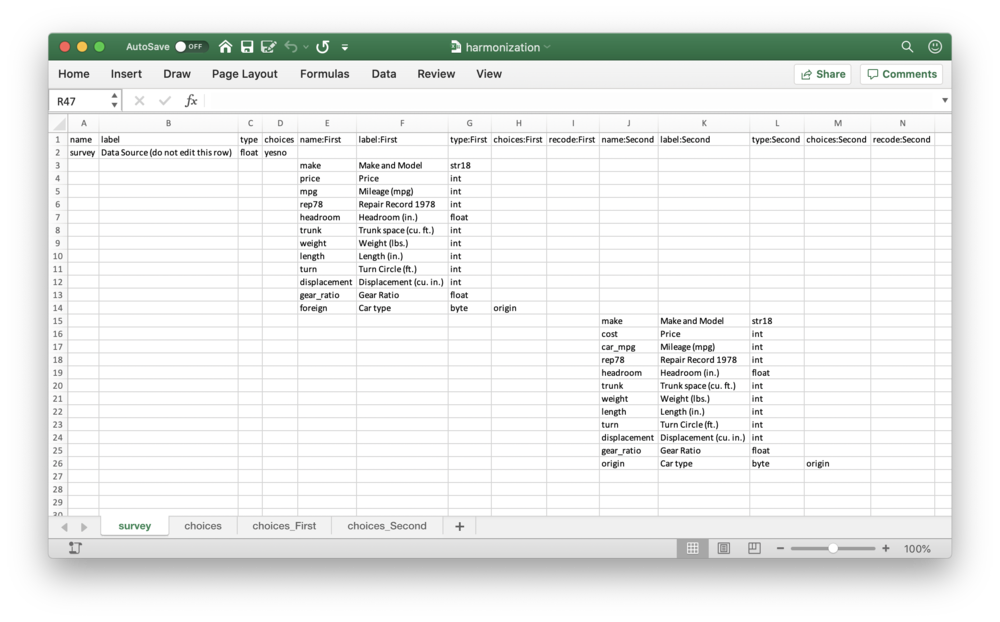
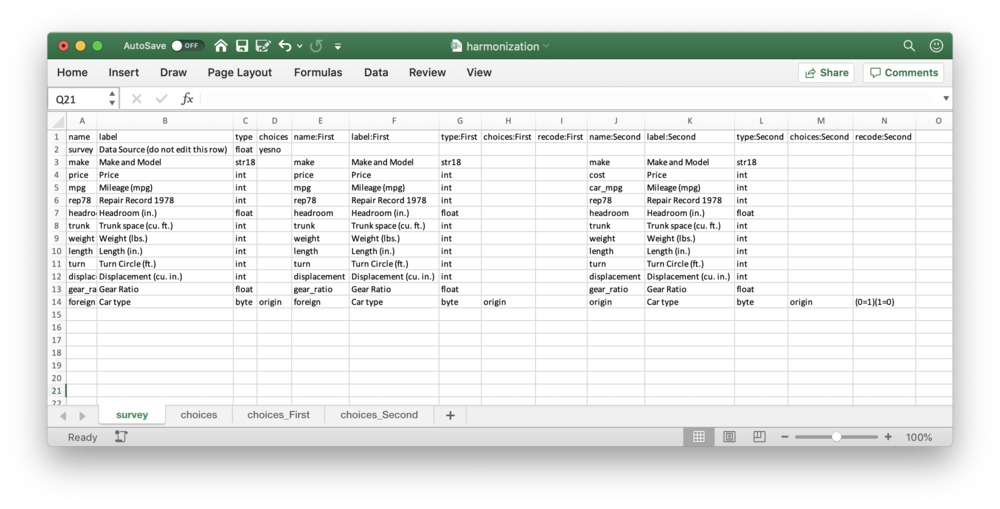
Next, combine the datasets to create a harmonization codebook template in Excel using iecodebook template. Name this file "harmonization.xlsx"'. This is shown in Figure 3. Run the following code.
 iecodebook template "data1.dta" "data2.dta" ///
    using "harmonization.xlsx" ///
    , surveys(First Second)
Note: The names of the surveys are First and Second. These names appear in the column names in Figure 3 below as follows - name:First, name:Second, label:First, label:Second, and so on.
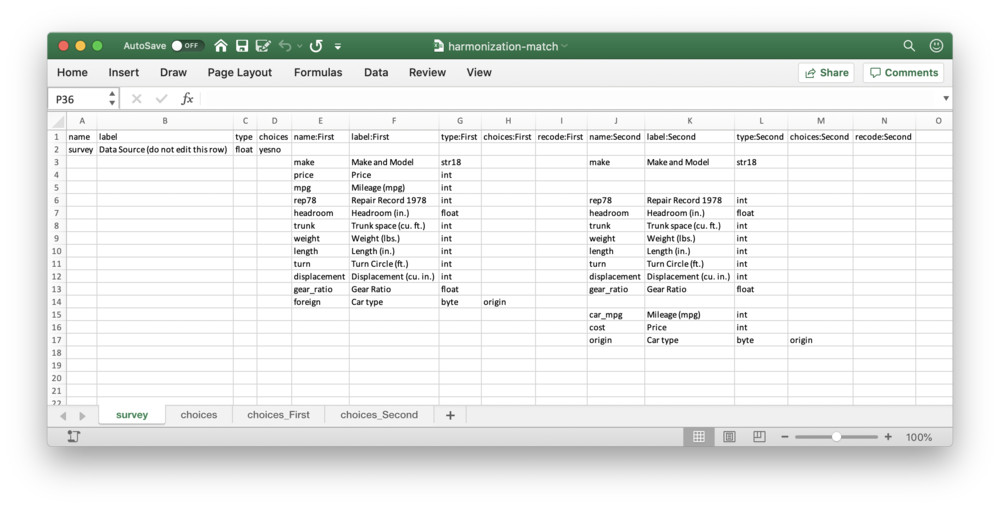
If you use the match option, the harmonization template will appear as shown in Figure 4 below. Note the following about the match option:
- In this case, the variables are ordered according to how they appear in the first dataset, that is, "data1.dta". However, the order of these variables in the underlying dataset does not get affected, it is only for the purpose of the codebook.
iecodebookwill never reorder variables beyond the functionality of the built-inappendsubcommand.
Step 3: Modify the codebook
Next, to resolve the differences between the two datasets - "data1.dta" and "data2.dta" , modify the completed codebook as shown in Figure 5. In order to harmonize the datasets, place variables from different datasets into the same row. This means that for iecodebook append to append properly, make sure that the variables have the same final variable names, labels, and value labels applied to them in the harmonization template. In our example, it means that for the variables that you want to append, ensure that each of them have the same values under name:First and name:Second columns, and so on for the label: and choices: columns.
Note: Keep the following points in mind when modifying the codebook.
- recode: columns: You will need to handle the
recodecommands dataset-by-dataset, instead of just re-arranging the variables. Which is why there is one recode: column for each survey (which acts as a source of data), as well as choices_ sheets for reference. - Value labels: As with
iecodebook apply, you will have to manually recreate the value label lists in the choices sheet. However, you can copy-paste data labels from your original datasets to the choices_First and choices_Second sheets respectively. This is shown in Figure 6 below.
Step 4: Append the datasets
Finally, append the harmonized datasets using the following code. Save the codebook with the same name, that is, "harmonization.xlsx" .
 iecodebook append "data1.dta" "data2.dta" ///
    using "harmonization.xlsx" ///
    , clear surveys(First Second)
Note: There are two important differences between the syntax for iecodebook append and iecodebook apply:
- Default is to drop: By default, the
iecodebook appendcommand will only keep those variables to which you explicitly give final names in the name column. This is to encourage you to manually review each variable. keepall: You may use thekeepalloption to retain all variables from all datasets, except the variables you have tagged for deletion by entering a single period (.) in the name column. This allows you to override the default drop option. However, you should still check the final dataset carefully because if youappendvariables without explicitly reviewing them, it may again cause problems with synchronization.
Output
The combined dataset will yield the following crosstabs. If you specify the report option, iecodebook will also create another codebook titled "codebook report.xlsx", in the same location as the harmonization codebook. This report documents the final state of the dataset for quick reference.
. ta survey foreign
         Data |        Foreign
       Source |  Domestic    Foreign |     Total
   -----------+----------------------+----------
        First |        52         22 |        74
       Second |        52         22 |        74
   -----------+----------------------+----------
        Total |       104         44 |       148
Export
Finally, iecodebook export provides a simple way to document the current state of a dataset, as well as perform simple automated data quality control tasks.
Syntax
The syntax for iecodebook export is as follows:
iecodebook export ///
    using "filename.xlsx" ///
    , [replace] [noexcel] [plaintext(compact|detailed)] ///
      [save] [saveas(filename.dta)] ///
      [verify] [signature] [reset] ///
      [trim("filename.do" ["filename.do"] [...])]
The basic command will simply produce a record of the dataset’s contents in a specified location in .xlsx format, similar to the features above. Requesting a plaintext version will give either a compact or detailed codebook using the codebook command. The noexcel option will turn off the .xlsx output.
Data Management and Quality Assurance
In addition to the basic codebook creation, iecodebook export offers several tools for automatic data management and quality assurance. First, it allows the user to save a copy of the data in the same location of the codebook using the save option. By default, that .dta file will have the same name as the codebook. Specifying saves() allows the user to change the name of the .dta file.
Second, it allows the user to verify the contents of data in several ways. If iecodebook export has already been used to place a codebook in the destination location, the verify option will ensure that the structure of the data being saved exactly matches the data structure the codebook details -- that no variables have been added or removed, that no labels or value labels have changed, and that no data types have changed. This is useful when data is being updated but the user wants to ensure that all downstream code will continue to run.
The user can also specify the signature option to create a corresponding datasignature in the destination folder. Specified initially with reset, the command will place a datasignature alongside the saved data. it will be named the same as the saved data file, with -sig.txt replacing .dta.
In future runs, the option will check whether a datasignature file with the same name is already present. If it is, and it is different, the command will return an error. This is useful when data should not be changing at all. It will also break if no datasignature is present. As in initializing the signature, reset will override the error and allow an updated signature to be written.
Finally, the trim() option allows the user to automatically reduce the variables in the dataset to exactly match those needed for a specific set of do-files. This is useful when creating reproducibility packages, and is also useful for removing PII data (which should not be called in analysis do-files, for instance). If the trim() option is specified, iecodebook export will work as described below:
- Read do-file:
iecodebook exportwill first read the contents of the specified do-files. - Drop irrelevant variables: It will then drop any variables that do not match the contents of the do-files.
- Save results. Finally, it will save the results in the same location as the codebook, in the form of a .dta file with the same name.
- Read do-file:
Note that trim() will not work with all do-files. For example, trim() will not correctly parse code that relies on macros to select variables; and it may not work correctly with abbreviations or wildcards, which are strongly discouraged. Therefore, you should always check that your results reproduce correctly after using this option.
Consider the following example to understand how the iecodebook export subcommand and the trim() option will work. Consider a do-file titled "analysis.do", which only contains one line of code:
sum foreign mpg trunk
Along with this, we also have the dataset we used previously, "auto.dta" dataset. Now we run the following code:
iecodebook export using "codebook-trim.xlsx" , trim("analysis.do")
Then this code saves a codebook called "codebook-trim.xlsx", and a dataset called "codebook-trim.dta" in the same location. Since only the variables foreign, mpg, and trunk are mentioned in the do-file titled "analysis.do", both - "codebook-trim.xlsx" and "codebook-trim.dta" - will only contain these 3 variables.
Related Pages
Click here for pages that link to this topic.
This page is part of the topic iefieldkit.
Additional Resources
- DIME Analytics (World Bank), The
iefieldkitGitHub page - DIME Analytics (World Bank) Data Cleaning with
iecodebook
